Saturday, 13 October 2012

L1 - Basics of QTP - Prerequisite of automating the scripts.

Addin

When you start the QTP, Addin manager screen opens, it shows which addins are associated.
Addin means the QTP is ready to test and recognize the objects of added addins.

You may Edit Addins by Goto -> File -> Settings -> Properties as shown below
Use this option to check many other properties like Run, Resources, Parameters, Environment, Web and Recovery.

Associate Add ins will show which add ins are installed and clicking on Modify button can further modify the add ins, Check the box which you want to associate with the test.


Interface

Keyword view

There are 2 type of view in QTP, first is Expert view and second is Keyword view.
Expert view is just like editor and show the code in traditional format.

Keyword view contains 4 columns:

Item | Operation | Value | Documentation
  1. Item : New step can be added from by clicking on the new row, as you click on the new row in item column, a popup menu opens -> there are 2 options that you can choose from there
      1. Object from repository : Any object from repository can be selected.
      2. Step generator : Using this option, step generator window gets open and a complete step can be generated using that (It will be covered in detail in some other post)
Both these options are used to generate new step in the code.
     2.  Operation : It is the operation that we want to do on the selected object.
     3.  Value : If any value is required for the function, then select here or leave it blank.
     4.  Documentation : It is used for comment purpose. (Auto generated)

Active Screen

It is used to show the currently active screen, and it provides the flexibility to the user to work on active screen even when the application is not available.

Data Table

It shows the data table that we are using in the test.

Debug Viewer

It is used while debugging the code, it also contains Watch, Variables and Command Window.


Options

Go to Tools -> Options

  1. General : It is used to set some general options like, "Display add in manager on start up" , "Display start page on start up", "Check for software updates on start up" etc, most of the options are self explanatory.
  2. Folders : It is used to set folder path that QTP use to find files. Plus button can be used to set folder path here.
  3. Active Screen : Setting fro Active screen can be done in this tab.
  4. Run : There are 2 modes of run.
    1. Normal : Step delay can set in milliseconds, and execution can be seen while running the test, it is used to check the path of the execution.
    2. Fast : There is no delay in this mode and execution can not be monitored while running the test.
    3. View result when session end can be used if you want to see result automatically after execution of test, if it is not marked then result window will have to be open explicitly.
  5. Windows application : Windows application properties can be set here (not required for startup, will take this topic separately in another blog)
  6. Web : This tab can be used to set properties for web applications, ignore type of browser can be set here.)

View Options

Go to Tools -> View options , use it to change your view options.


Thursday, 11 October 2012

L2 - Starting with QTP - Create a basic test

To start with QTP, we must create a simple basic test with QTP, motive of this test is to perform addition function on calculator and check weather the outcome/actual result is equal to the expected result. There are some steps that we should follow while creating any basic test.


Test Name : Basic test for addition of Calculator

You may go to the following link to go through the basics of QTP to start, please check this


Step 1. Always create complete object repository as the first step while creating any test.

To create OR

1.1 Go to Menu item Resources -> Object repository.
1.2 Click on "Add object to local" button -> Cursor will change to "hand" icon, click the cursor on Calculator on the top of task bar (It will add all the objects of Calculator at once, if we click on any object then only 1 object will be added in the OR, adding all the objects at once is recommended.)
1.3 Press Ok -> Default objects only -> Ok to add all the objects in OR.


Step2. Perform the action. (You may record the action like in the example we are taking Start recording -> Click 4 button -> Click + button -> Click Click 6 button -> Click = button on calculator) to perform action 4+6 on calculator.
' Record the action    
Window("Calculator").Activate
Window("Calculator").WinButton("C").Click
Window("Calculator").WinButton("4").Click
Window("Calculator").WinButton("+").Click
Window("Calculator").WinButton("6").Click
Window("Calculator").WinButton("=").Click

Step 3. Read the actual result value from the object where result is being shown.
           Tip : If you do not know the name of the object use "Locate in repository: functionality in Object Repository.

Use "GetROProperty" to read the value from the text box.

strValue=Window("Calculator").WinEdit("Edit").GetROProperty("text")

Keyword view can also be use to used to generate above code.


Step 4. Compare actual result and expected result.

Step 5 Post the result using "reporter.ReportEvent"

If  strValue= "10. "Then
reporter.ReportEvent micPass,"add", "pass"
Else 
reporter.ReportEvent micFail,"Fail", "Expected value is 10. and the actual result is " & strValue
End If

Step 6. View result in Menu -> Automation -> Results.


******************Complete Code********************
' Record the action    
Window(" Calculator").Activate
Window("Calculator").WinButton("C").Click
Window("Calculator").WinButton("4").Click
Window("Calculator").WinButton("+").Click
Window("Calculator").WinButton("6").Click
Window("Calculator").WinButton("=").Click
' Read result    
strValue=Window("Calculator").WinEdit("Edit").GetROProperty("text")
msgbox strValue
' Compare the result   
If  strValue= "11. "Then
'msgbox "pass"
' Report the result   
reporter.ReportEvent micPass,"add", "pass"
Else 
' msgbox "Fail"
reporter.ReportEvent micFail,"Fail", "Expected value is 11. and the actual result is " & strValue
End If
********************************************************

Sunday, 7 October 2012

L3 - Run multiple cases using Datatable

Test case to run multiple cases on Calculator using DATA TABLE

Step 1. Go to Menu View -> Data Table
Step 2. Create data table in Local data table Action1 as shown below :

Start the test as written below:
' Start the test    
Window("Calculator").Activate
icurrentrow=1
' Set datasheet as LOCAL datasheet    
DataTable.GetSheet dtlocalsheet   
' Set row as first row    
DataTable.SetCurrentRow icurrentrow  
Window("Calculator").WinButton("C").Click

Step 3. Now we have to use for loop to cover all the 5 rows.

(TIP: Make sure that in Keyword view -> Actions (Right Click) -> Actions Call Properties -> Datatable Iterations is set to : One iteration only.)
To cover each column we have to use this code

DataTable.value("input1",dtlocalsheet)

Here input1 is field name and same way we have to use different field.
We have to write below code:

For i=1 to 5
Window("Calculator").Activate
' Reading the values from datatable    
Window("Calculator").WinButton(DataTable.value("input1",dtlocalsheet)).Click
Window("Calculator").WinButton(DataTable.value("operator",dtlocalsheet)).Click
Window("Calculator").WinButton(DataTable.value("input2",dtlocalsheet)).Click
Window("Calculator").WinButton("=").Click
' Read the results    
strActualResult = Window("Calculator").WinEdit("Edit").GetROProperty("text")
strExpectedResult=DataTable.value("result",dtlocalsheet)
strExpectedResult=strExpectedResult & ". "
' Compare the result    
If  strActualResult  = strExpectedResult Then
' Post the result   
reporter.ReportEvent micPass,"Expetected result is " & strExpectedResult & " and my actual result is " & strActualResult, "Pass"
else
reporter.ReportEvent micFail,"displaying data","Expected is ="& DataTable.value("result",dtlocalsheet)& "and my actual result is " & strActualResult
End If
Window("Calculator").WinButton("C").Click
' Set next row as current row    
icurrentrow = icurrentrow +1
DataTable.SetCurrentRow icurrentrow
' Moving for loop to next    
Next


****************Complete Code of test as below****************

Window("Calculator").Activate
icurrentrow=1
DataTable.GetSheet dtlocalsheet   
DataTable.SetCurrentRow icurrentrow  
Window("Calculator").WinButton("C").Click
DataTable.value("input1",dtlocalsheet)
For i=1 to 5
Window("Calculator").Activate
Window("Calculator").WinButton(DataTable.value("input1",dtlocalsheet)).Click
Window("Calculator").WinButton(DataTable.value("operator",dtlocalsheet)).Click
Window("Calculator").WinButton(DataTable.value("input2",dtlocalsheet)).Click
Window("Calculator").WinButton("=").Click
strActualResult = Window("Calculator").WinEdit("Edit").GetROProperty("text")
strExpectedResult=DataTable.value("result",dtlocalsheet)
strExpectedResult=strExpectedResult & ". "
If  strActualResult  = strExpectedResult Then
reporter.ReportEvent micPass,"Expetected result is " & strExpectedResult & " and my actual result is " & strActualResult, "Pass"
else
reporter.ReportEvent micFail,"displaying data","Expected is ="& DataTable.value("result",dtlocalsheet)& "and my actual result is " & strActualResult
End If
Window("Calculator").WinButton("C").Click
icurrentrow = icurrentrow +1
DataTable.SetCurrentRow icurrentrow
Next

Thursday, 4 October 2012

L4 - Run multiple cases using using PARAMETERIZATION


PARAMETERIZATION

We can run multiple cases without using FOR LOOP, there is inbuilt functionality in QTP that we can use to run multiple test cases using PARAMETERIZATION.

Below is Sample test case to run multiple test case using PARAMETERIZATION.

Application used : Flight reservation.

Step 1. Record an action to insert a order in Flight reservation.

Window("Flight Reservation").WinMenu("Menu").Select "File;New Order"
Window("Flight Reservation").ActiveX("MaskEdBox").Type "121212"
Window("Flight Reservation").ActiveX("MaskEdBox").Type  micTab 
Window("Flight Reservation").WinComboBox("Fly From:").Select "London"
Window("Flight Reservation").WinComboBox("Fly To:").Select "Frankfurt"
Window("Flight Reservation").WinButton("FLIGHT").Click
Window("Flight Reservation").Dialog("Flights Table").WinButton("OK").VirtualObject("object").Click 28,9
Window("Flight Reservation").WinEdit("Name:").Set "AAAAAA"
Window("Flight Reservation").WinButton("Insert Order").Click

Now we have the problem statement to insert multiple orders, like in this example we will run first iteration with "AAAAA" and run run second and third iteration with data "BBBBB" and "CCCCC" respectively.

Step 2. Go to Keyword view and click on the button adjacent to Value column "AAAAA" as shown below.


Step 3. It will open "Value configurations options" window as shown below.

Set Parameter as "Data Table"
Name (Of your choice) - I have taken here as "Input_Name"
Location in Data table as "Current action sheet(local)" (Discussion on Global sheet we leave as of now for further posts and discussions)
Press OK -> It will insert a column in data table as shown below :


Step 4. Insert 2 more values "BBBBBBBB" and "CCCCCCC" in row number 3 and 4.

Step 5. Right click on Action -> Click in menu "Action call properties" as shown below

TIP : If menu item "Action call properties" is not there in Menu, then Goto -> Action properties -> uncheck "reusable action" -> OK, menu item "Action call properties" will come now.


Step 6. Set Run on all rows.

Now run the test case - > It will run 3 time for all the values "AAAAAA", "BBBBB" and "CCCCC"


Tuesday, 2 October 2012

L5 - Types of recording

Types of recording

Go to Automation -> Record and Run Settings.
First thing that you have to determine is weather you want to do recording on Web based application or Windows based application, as shown below.


Both the tabs has some properties, some points you have to take care are :-

1. Choose the correct option while recording Windows application from "Record and run on any windows based application"/ "Record and run only on", if you select second option then it will record on applications as per the setting done below this option only, like you can add any application below using the + button.

Types of recording :

1. Recording using "Record" button with default settings.

Start recording with Calculator and it will generate script as shown below :

Window("Calculator").Activate
Window("Calculator").WinButton("7").Click
Window("Calculator").WinButton("4").Click
Window("Calculator").WinButton("5").Click
Window("Calculator").WinButton("2").Click

it denotes Window name/ Object name / Action performed

2. Analog recording

To start Analog recording, press Record button -> Go to Menu "Automation" -> Analog recording.
It will pop up a window as below:

We can do Analog recording in 2 types:

2.1 Record relative to screen

In this mode if recording is done by pressing button "Start Analog recording" and do complete action, a track of the path of the cursor is created and recorded, important thing is that it is relative to computer screen
it means if the application changes its position the the Play will not be correct, it takes co-ordinates of scree as 0,0 and record track in relation of this 0,0, so it is mandatory to open the application at same position on screen every time to run this step correctly.

You have to press "Stop" to complete the recording. Track code generated after recording as below:
Desktop.RunAnalog "Track1"

2.2 Record relative to following window

To start, Select "Record relative to following window" and click on hand button and select any window with respect to which recording will be done as below.

Now start recording and stop recording to generate the code.
Window("Calculator").RunAnalog "Track2"

The advantage of this recording is that it does not matter at what position of screen the application is opened at, recording is done with taking 0,0 of Calculator in this case, as long as object are at same place within the calculator this recording will run fine.

3. Low level recording

To start Low level recording click Record button-> Automation -> Low level recording and do the recording, following code will be generated 

Window("Calculator").WinObject("4").Click 5,13
Window("Calculator").WinObject("5").Click 10,16
Window("Calculator").WinObject("4").Click 15,16
Window("Calculator").WinObject("7").Click 13,14

it denotes Window name/ Object name / Action performed/ Co ordinates of object
Do this type of recording if exact coordinates are required.


Monday, 1 October 2012

L6 - Synchronization

What is Synchronization?

Synchronization is to sync the actions of application and QTP execution of tests, it is quite possible that QTP needs to wait for application to perform some action before executing next step, but how QTP would know that QTP should wait or not at any specific step, to handle this situation QTP use 3 types of Synchronization.

When Synchronization is required?

Whenever QTP has to wait for some time for some action to be performed completely before moving to next action.

1. Global Synchronization

Synchronization can be set globally and for example if we set synchronization time as 10 second, it works on best time formula, as if some action(Condition) is performed in 1 second then QTP will not wait for next 9 second to perform next action, it will move to next step immediately. If the action(Condition) is not done in 10 seconds the QTP will throw error .

How to set synchronization
File -> Settings -> Run -> Object synchronization time out.
In below example 20 second is set as synchronization time out.

2. Local Constant

The other way to set local constant synchronization is to use wait function.
To make QTP wait for 10 seconds, wait(10) should be used, by using "wait", it will make sure that QTP waits for exact 10 seconds whenever QTP encounters wait in test.

It does not depend on any other condition/completion of previous step.

3. Local Variable Synchronization

We can insert synchronization point explicitly anywhere on above of the global synchronization point, in that case it will work as Global synchronization point + local synchronization point.

To demonstrate the working of local synchronization point we can take example of Flight reservation sample application.

In this application , after Click on "Insert Order" button, it process the order and process bar comes for few seconds, now to learn working of local synchronization,

 Step 1 first set File -> Settings -> Run -> Object synchronization time out = 0 which means synchronization is 0 and we have to put local synchronization at this point before executing next step.


Step 2

While processing is being done, all the objects are disabled, so we can design the synchronization point to check if the text box is enabled or not.

Click on "Recording" button -> Insert Synchronization point -> and click on the text box marked in below image (We will put synchronization at this point until it is enabled)

Press Ok


We have to set 3 fields in next image (Add Synchronization point screen).
1. Property name
2. Property value
3. Timeout (in milliseconds)


Now press Ok, a new line of code will be inserted.
Window("Flight Reservation").WinEdit("Name:").WaitProperty "enabled", True, 10000
QTP will wait to get "Edit" enabled till 10 seconds, using best time formula (If it is enabled before 10 seconds, QTP will move to next step in the test at that point of time.)

********************Complete Code********************

Window("Flight Reservation").Activate
Window("Flight Reservation").WinMenu("Menu").Select "File;New Order"
Window("Flight Reservation").ActiveX("MaskEdBox").Type "121212"
Window("Flight Reservation").WinComboBox("Fly From:").Select "Frankfurt"
Window("Flight Reservation").WinComboBox("Fly To:").Select "Denver"
Window("Flight Reservation").WinButton("FLIGHT").Click
Window("Flight Reservation").Dialog("Flights Table").WinButton("OK").Click
Window("Flight Reservation").Activate
Window("Flight Reservation").WinEdit("Name:").Set "Manu"
Window("Flight Reservation").WinButton("Insert Order").Click
Window("Flight Reservation").WaitProperty "enabled", TRUE, 10000
Window("Flight Reservation").WinEdit("Name:").WaitProperty "enabled", True, 10000
Window("Flight Reservation").Activate
Window("Flight Reservation").WinEdit("Name:").SetSelection 0,4
Window("Flight Reservation").WinEdit("Name:").Set "Joshi"
Window("Flight Reservation").WinEdit("Name:").Type  micTab

Sunday, 30 September 2012

L7 - Handle multiple digits in Calculator

Problem statement : How to test calculator for multiple digits of different lengths.

We will use function to handle this type of situation as below:

Step 1.

Create a datatable as shown below:

Step2 . Write script as below:

x=1
DataTable.GetSheet dtlocalsheet
For x=1 to 2
DataTable.SetCurrentRow x
Window("Calculator").Activate
Window("Calculator").WinButton("C").Click
op1=DataTable.Value("Operand1",dtlocalsheet)
' Call function to click Operand 1
strcut(op1)
Window("Calculator").WinButton(DataTable.Value("Operator",dtlocalsheet)).Click
op2=DataTable.Value("Operand2",dtlocalsheet)
' Call function to click Operand 2
strcut(op2)
Window("Calculator").WinButton("=").Click
res=Window("Calculator").WinEdit("Edit").GetROProperty ("text")
ex_res=DataTable.Value("Expected_Result",dtlocalsheet) & ". "
If res=ex_res Then
reporter.ReportEvent micPass,"Passed","Succesfull" 
else
reporter.ReportEvent micFail,"Failed","Fail"
End If

Next

'Function to access value from data table and click one by one on calculator.
Function strcut(op)
    L=len(op)
For i=1 to L
t=mid(op,i,1)
Window("Calculator").WinButton(t).Click
Next
End Function

Tuesday, 25 September 2012

L8 - Standard Checkpoint


STEPS
Press Record -> Insert -> Checkpoint -> Standard Checkpoint


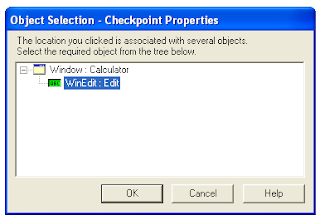
Select the object on which Standard checkpoint has to be placed.

A new window will open for “Checkpoint properties”


Here we can select the properties that we want to check.
We can configure value as :
1. Constant : put some constant value that is the expected value.
2. Parameter : We can parameterize the value also and can select the values from our desired location.
Checkpoint timeout:
At run time QTP will wait for the time that is provided in Checkpoint timeout value if the expected result is not there.
Press Ok, code as below will be generated automatically.
Window("Calculator").WinEdit("Edit").Check CheckPoint("Edit")
We can EDIT the Checkpoint by placing curson on Checkpoint -> Right Click -> Checkpoint properties.

Sunday, 23 September 2012

L9 - Text Checkpoint


Text Checkpoint is used to check text at any object for web or windows application.
We can configure the text at any position, for details let’s see the example below.
Application used: Flight reservation.
Open the window as show below.


Record -> Insert -> Checkpoints -> Text Checkpoint
The cursor will change to hand icon and click on the above window.
Text  Checkpoint properties window will open-> Press OK.
Window as below will open.


In Checkpoint summary -> [Complex value] is being displayed, it can be configured using “Configure” button.
Click on Configure button and a new window will open as below, here we can configure the text selection using “Checked text”, “Text before” and “Text after button”


Press Ok and Text Checkpoint code will automatically inserted in the script as below.
Window("Flight Reservation").Dialog("Flights Table").WinList("From").Check CheckPoint("From_2")
We can EDIT the Checkpoint by placing cursor on Checkpoint -> Right Click -> Checkpoint properties.


Sunday, 16 September 2012

L10 - Text Area Checkpoint


Text Area Checkpoint is used to check text at any object for web or windows application.
We can select any specific are for text at any position, for details let’s see the example below.
Application used: Flight reservation.
Open the window as shown below.


Record -> Insert -> Checkpoints -> Text Area Checkpoint
The cursor will change to marker and Select the area of text on the above window.


Text  Checkpoint properties window will open-> Press OK.
Window as below will open.


Click on Configure button and a new window will open as below, here we can configure the text selection using “Checked text”, “Text before” and “Text after button”


Press Ok and Text Checkpoint code will automatically inserted in the script as below.
Window("Flight Reservation").Dialog("Flights Table").WinList("From").Check CheckPoint("From_2")
We can EDIT the Checkpoint by placing cursor on Checkpoint -> Right Click -> Checkpoint properties.

Sunday, 9 September 2012

L11 - Bitmap Checkpoint


Bitmap checkpoint is used to check image that it is the correct image and is loaded properly.
To create bitmap checkpoint follow steps as below.
(Here we are taking a case of an image opened in Paint)
Record -> Insert -> Checkpoint -> Bitmap Checkpoint-> Cursor will change to hand icon, click on the image opened
Bitmap checkpoint properties window will open as below.

Press OK.
A new window open with the selected image captured and being show in the window as below.


Press OK.
Code as below will be automatically generated.
Window("Paint_2").WinObject("Afx:1000000:8").Check CheckPoint("Afx:1000000:8")
Now run the case, if there is no change in image, Test will pass else test will fail, we can see the difference in expected and actual result as shown below in case of Fail.


Friday, 7 September 2012

L12 - Database Checkpoint


Database Checkpoint

Database checkpoint is used to check database values at run time.
To create database checkpoint

Step 1

Goto Menu ->  Insert -> Checkpoint -> Database Checkpoint

Step 2

Database Query wizard will open.
Select "Create query using Microsoft query".
Press Next

Step 3

Press Ok.

Step 4

Select MS Access database as per are taking example with MS access database.

Step 5

Select the database that is being used.

Step 6 

Select any table with some fields.


Step 7

Put conditions for query.


Step 8

Select option "Exit and return to Quick test professional'

Step 9

There are 2 buttons on right side.
These buttons are used to check and un check any value
We can configure the values in the bottom part of window as per our choice, either constant or parameter.


Code is generated as below:

DbTable("DbTable_2").Check CheckPoint("DbTable_2")


Run the test , it will pass , change the values in the table it will fail.

Tuesday, 4 September 2012

L13 - Accessibility Checkpoint


Section 508 criteria for Web-based technology and information systems are based on access guidelines generated by Web Accessibility Initiative of the World Wide Web Consortium (W3C).
Accessibility Checkpoints are designed to check areas of any Web site that require special attention according to the W3C (World Wide Web Consortium ) Web Content Accessibility Guidelines. They do not necessarily indicate whether the Web site under test conforms to the guidelines.
Accessibility checkpoints can be add to help quickly identify areas of any Web site that may not conform to the W3C Web Content Accessibility Guidelines. You can add automatic accessibility checkpoints to each page in website under test, or you can add individual accessibility checkpoints to individual pages or frames.
To insert Accessibility checkpoint
Record -> Insert -> Checkpoint -> Accessibility Checkpoint

Saturday, 1 September 2012

L14 - XML Checkpoint


Step 1  <!--[endif]-->Make a sample xml file


Step 2

To set XMl checkpoint (From resource) Goto Menu Insert -> Checkpoint -> XML Checkpoint (From resource)

Step 3 

Option to choose XML file from source will come, choose any xml file saved to the system.

 Step 4

Now a new window will open with name "XML Checkpoint properties", check the check boxes on left side whatever needs to be checked and press Ok.


A line of code will generate for xml check point as below:


XMLFile("Test.xml").Check CheckPoint("Test.xml")

If we run the test case it will pass and if we make some changes in the content of XML checkpoint and run – It will FAIL.

Thursday, 30 August 2012

L15 - Standard Output Value


It reads the standard value from any object and place the value in datatable run time dynamically.

Step 1

Start recording.

Step 2

Goto Menu Insert -> Output value -> Standard output value.


Step 3

Select "Agent Name" in the example and a window will open "Object selection: output value properties"
Objective is to select object from where we have to take output value.
Press Ok.

Step 5

Select the property in "Object value properties" window the value of which is required at run time.

Configure value:
To configure the value option is there in lower side of window. 


Step 6

Press Ok and the code as below gets generated and a column is added in the datasheet where the value will come during run time.


Step 7

Dialog("Login").WinEdit("Agent Name:").Output CheckPoint("Agent Name:")
x = datatable.Value("Agent_Name_text_out", dtlocalsheet)
Msgbox x


Step 8

It will show the current value in the text box.