Sunday, 30 September 2012

L7 - Handle multiple digits in Calculator

Problem statement : How to test calculator for multiple digits of different lengths.

We will use function to handle this type of situation as below:

Step 1.

Create a datatable as shown below:

Step2 . Write script as below:

x=1
DataTable.GetSheet dtlocalsheet
For x=1 to 2
DataTable.SetCurrentRow x
Window("Calculator").Activate
Window("Calculator").WinButton("C").Click
op1=DataTable.Value("Operand1",dtlocalsheet)
' Call function to click Operand 1
strcut(op1)
Window("Calculator").WinButton(DataTable.Value("Operator",dtlocalsheet)).Click
op2=DataTable.Value("Operand2",dtlocalsheet)
' Call function to click Operand 2
strcut(op2)
Window("Calculator").WinButton("=").Click
res=Window("Calculator").WinEdit("Edit").GetROProperty ("text")
ex_res=DataTable.Value("Expected_Result",dtlocalsheet) & ". "
If res=ex_res Then
reporter.ReportEvent micPass,"Passed","Succesfull" 
else
reporter.ReportEvent micFail,"Failed","Fail"
End If

Next

'Function to access value from data table and click one by one on calculator.
Function strcut(op)
    L=len(op)
For i=1 to L
t=mid(op,i,1)
Window("Calculator").WinButton(t).Click
Next
End Function

Tuesday, 25 September 2012

L8 - Standard Checkpoint


STEPS
Press Record -> Insert -> Checkpoint -> Standard Checkpoint


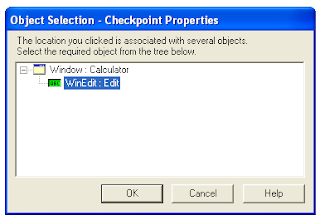
Select the object on which Standard checkpoint has to be placed.

A new window will open for “Checkpoint properties”


Here we can select the properties that we want to check.
We can configure value as :
1. Constant : put some constant value that is the expected value.
2. Parameter : We can parameterize the value also and can select the values from our desired location.
Checkpoint timeout:
At run time QTP will wait for the time that is provided in Checkpoint timeout value if the expected result is not there.
Press Ok, code as below will be generated automatically.
Window("Calculator").WinEdit("Edit").Check CheckPoint("Edit")
We can EDIT the Checkpoint by placing curson on Checkpoint -> Right Click -> Checkpoint properties.

Sunday, 23 September 2012

L9 - Text Checkpoint


Text Checkpoint is used to check text at any object for web or windows application.
We can configure the text at any position, for details let’s see the example below.
Application used: Flight reservation.
Open the window as show below.


Record -> Insert -> Checkpoints -> Text Checkpoint
The cursor will change to hand icon and click on the above window.
Text  Checkpoint properties window will open-> Press OK.
Window as below will open.


In Checkpoint summary -> [Complex value] is being displayed, it can be configured using “Configure” button.
Click on Configure button and a new window will open as below, here we can configure the text selection using “Checked text”, “Text before” and “Text after button”


Press Ok and Text Checkpoint code will automatically inserted in the script as below.
Window("Flight Reservation").Dialog("Flights Table").WinList("From").Check CheckPoint("From_2")
We can EDIT the Checkpoint by placing cursor on Checkpoint -> Right Click -> Checkpoint properties.


Sunday, 16 September 2012

L10 - Text Area Checkpoint


Text Area Checkpoint is used to check text at any object for web or windows application.
We can select any specific are for text at any position, for details let’s see the example below.
Application used: Flight reservation.
Open the window as shown below.


Record -> Insert -> Checkpoints -> Text Area Checkpoint
The cursor will change to marker and Select the area of text on the above window.


Text  Checkpoint properties window will open-> Press OK.
Window as below will open.


Click on Configure button and a new window will open as below, here we can configure the text selection using “Checked text”, “Text before” and “Text after button”


Press Ok and Text Checkpoint code will automatically inserted in the script as below.
Window("Flight Reservation").Dialog("Flights Table").WinList("From").Check CheckPoint("From_2")
We can EDIT the Checkpoint by placing cursor on Checkpoint -> Right Click -> Checkpoint properties.

Sunday, 9 September 2012

L11 - Bitmap Checkpoint


Bitmap checkpoint is used to check image that it is the correct image and is loaded properly.
To create bitmap checkpoint follow steps as below.
(Here we are taking a case of an image opened in Paint)
Record -> Insert -> Checkpoint -> Bitmap Checkpoint-> Cursor will change to hand icon, click on the image opened
Bitmap checkpoint properties window will open as below.

Press OK.
A new window open with the selected image captured and being show in the window as below.


Press OK.
Code as below will be automatically generated.
Window("Paint_2").WinObject("Afx:1000000:8").Check CheckPoint("Afx:1000000:8")
Now run the case, if there is no change in image, Test will pass else test will fail, we can see the difference in expected and actual result as shown below in case of Fail.


Friday, 7 September 2012

L12 - Database Checkpoint


Database Checkpoint

Database checkpoint is used to check database values at run time.
To create database checkpoint

Step 1

Goto Menu ->  Insert -> Checkpoint -> Database Checkpoint

Step 2

Database Query wizard will open.
Select "Create query using Microsoft query".
Press Next

Step 3

Press Ok.

Step 4

Select MS Access database as per are taking example with MS access database.

Step 5

Select the database that is being used.

Step 6 

Select any table with some fields.


Step 7

Put conditions for query.


Step 8

Select option "Exit and return to Quick test professional'

Step 9

There are 2 buttons on right side.
These buttons are used to check and un check any value
We can configure the values in the bottom part of window as per our choice, either constant or parameter.


Code is generated as below:

DbTable("DbTable_2").Check CheckPoint("DbTable_2")


Run the test , it will pass , change the values in the table it will fail.

Tuesday, 4 September 2012

L13 - Accessibility Checkpoint


Section 508 criteria for Web-based technology and information systems are based on access guidelines generated by Web Accessibility Initiative of the World Wide Web Consortium (W3C).
Accessibility Checkpoints are designed to check areas of any Web site that require special attention according to the W3C (World Wide Web Consortium ) Web Content Accessibility Guidelines. They do not necessarily indicate whether the Web site under test conforms to the guidelines.
Accessibility checkpoints can be add to help quickly identify areas of any Web site that may not conform to the W3C Web Content Accessibility Guidelines. You can add automatic accessibility checkpoints to each page in website under test, or you can add individual accessibility checkpoints to individual pages or frames.
To insert Accessibility checkpoint
Record -> Insert -> Checkpoint -> Accessibility Checkpoint

Saturday, 1 September 2012

L14 - XML Checkpoint


Step 1  <!--[endif]-->Make a sample xml file


Step 2

To set XMl checkpoint (From resource) Goto Menu Insert -> Checkpoint -> XML Checkpoint (From resource)

Step 3 

Option to choose XML file from source will come, choose any xml file saved to the system.

 Step 4

Now a new window will open with name "XML Checkpoint properties", check the check boxes on left side whatever needs to be checked and press Ok.


A line of code will generate for xml check point as below:


XMLFile("Test.xml").Check CheckPoint("Test.xml")

If we run the test case it will pass and if we make some changes in the content of XML checkpoint and run – It will FAIL.